Welcome to FlutterGo.AI
FlutterGo.AI helps you build mobile apps in your browser. You describe what you want, and the studio designs it, writes the code, and runs a live preview. You do not need to install anything to try it. The same project can ship to Android and iOS.
The quickest way to understand it is to watch a real app run inside the studio. In the video below, Rebuild compiles Lumo, a full shopping app built with FlutterGo.AI. It opens in the phone preview next to your chat, build logs, Hot reload, and Build APK. You will see onboarding, sign-in, browsing, product pages, the bag, checkout, a confirmed order, saved items, account settings, and search.
Watch the studio showcase (compile time shortened for the video).
Inside the studio: Lumo compiles, boots in the preview, and you can tap through the whole shopping flow without leaving the page.
What you are looking at#
Lumo is a working store app, not a slideshow.
- Onboarding uses full-screen photos with Skip and Get started.
- Sign in supports email, Google, or guest checkout.
- Home shows categories, a hero banner, and product cards with real photos and prices.
- Product pages include ratings, colour options, favourites, and Add to bag.
- Bag and checkout handle quantities, shipping, payment choice, and order totals.
- Orders show up right away under My orders with status and details.
- Saved and account cover wishlists, addresses, and preferences.
- Search works across the catalog.
The same codebase can become an Android APK or an iOS build when you are ready to publish.
Tip: Lumo is available as a template on the studio home. Open FlutterGo.AI and choose Eshop App Full Mvp if you want to start from this app and customise it.
The app on its own screen#
Here is the same journey again, full screen, like holding the phone in your hand.
Watch the close-up tour (with narration).
Full-screen walkthrough: onboarding through search, all from one project.
How building works#
You describe the idea. The agent asks a few setup questions, plans the app, writes the code, fixes build issues, and opens a live preview. Want to see that whole process? Read Build your first app.
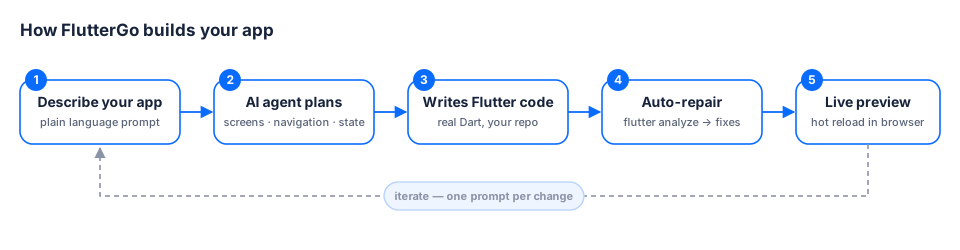
The same loop repeats whenever you send a new prompt.
Getting started#
- Go to fluttergo.ai and click Open studio, then create a free account.
- Type your app name in the prompt box on the studio home (for example SpendWise). FlutterGo asks for the full idea in a setup form right after you press Send.
- Press Send, answer the setup questions, and click Run app when you want to see it live.
What you need#
| Browser | A recent version of Chrome, Edge, Firefox, or Safari. |
| Internet | Needed for generation and cloud previews. |
| Account | Free to start. The free plan includes 10 AI credits per month. |
| Coding skills | Not required. You can still export and edit all the code later. |
| GitHub (optional) | Worth connecting early so your code lives in your own repo. |
| Desktop app (optional) | For simulators and Local Mode on Pro. Find it under ? menu → Download desktop app. |
A few tips for your first session:
- On the home screen, a short app name is enough. Save screen lists and features for the setup form.
- Change one thing per follow-up prompt after the first build.
- Connect GitHub when you can so every edit is saved.
- Browse templates if one is close to your idea.
Heads up: FlutterGo.AI is still a research preview, so features change often. Check ? menu → What's new for updates.
Where to go next#
- Build your first app: watch a full build from a real session.
- Creating your account & signing in
- The studio dashboard
- Plans, credits & billing