
A project is your app's home inside FlutterGo.AI. It holds your Flutter code, your chat with the agent and your live preview, all in one place.
You start every project the same way: describe what you want on Home, choose what to build, and click Start building. FlutterGo creates the project and the agent starts right away. You don't need to know anything about Flutter or coding.
Here we walk through those steps, then cover naming, renaming and deleting projects, and how many projects your plan allows.
What you need#
- A FlutterGo.AI account, signed in at fluttergo.ai. Your projects are saved to your account.
- A sentence or two about your idea. Name the screens and features you want.
- A free slot: the Free plan allows 2 projects (see How many projects you can have).
How to do it#
1. Describe your app on Home#
Click Home in the left sidebar. Type your idea into the box that says "Describe the app you want: the screens, the features, how it should feel. We build it."
Home: the prompt box, the Mobile app and Website choices, and Start building.
Example: "Recipe Box: a recipe app with search, favorites and a step-by-step cooking mode."
2. Choose Mobile app or Website#
Under the text, pick what to build:
- Mobile app (selected by default): a real Flutter app for Android, iOS and the web.
- Website: a website. See Building a website.
3. Add extras with + (optional)#
Click + next to the box to:
- type a Project name (otherwise FlutterGo names the project from your description);
- Attach files, or Attach Figma link, for designs the agent should follow;
- start from an app you already have: Import Android & iOS app (a ZIP file) or Clone from GitHub. See Importing an existing app.
The tiles under the box do the same jobs: Files and Photos attach files, ZIP and GitHub import an app, and Figma starts from a Figma design. The Website tile is different: it starts a prompt to rebuild an existing website as a Flutter app.
4. Click Start building#
Click Start building. On the Free plan, a note under the box tells new accounts: "Your first app build uses 1 credit. Finishing it and fixing a failed build are free."
5. Choose where data lives#
FlutterGo asks Where should data live? and offers two choices:
- Supabase: sign-in and a real database from day one.
- Skip for now: build the screens first and link a backend later.
Pick one and click Open workspace. If your description already says the app needs no backend, FlutterGo skips this question.
Supabase now, or skip and add a backend later. See Backends.
6. Watch your project open#
The workspace opens: your chat on the left, the app preview in the middle, and the right panel with Run, Analysis, Ship and Show code. The agent plans the app, writes the code and fixes its own errors. The preview builds by itself when the agent is done.
If your description was very short, the agent first asks a few questions in a Quick setup form, in the Questions tab. Answering it costs no credits.
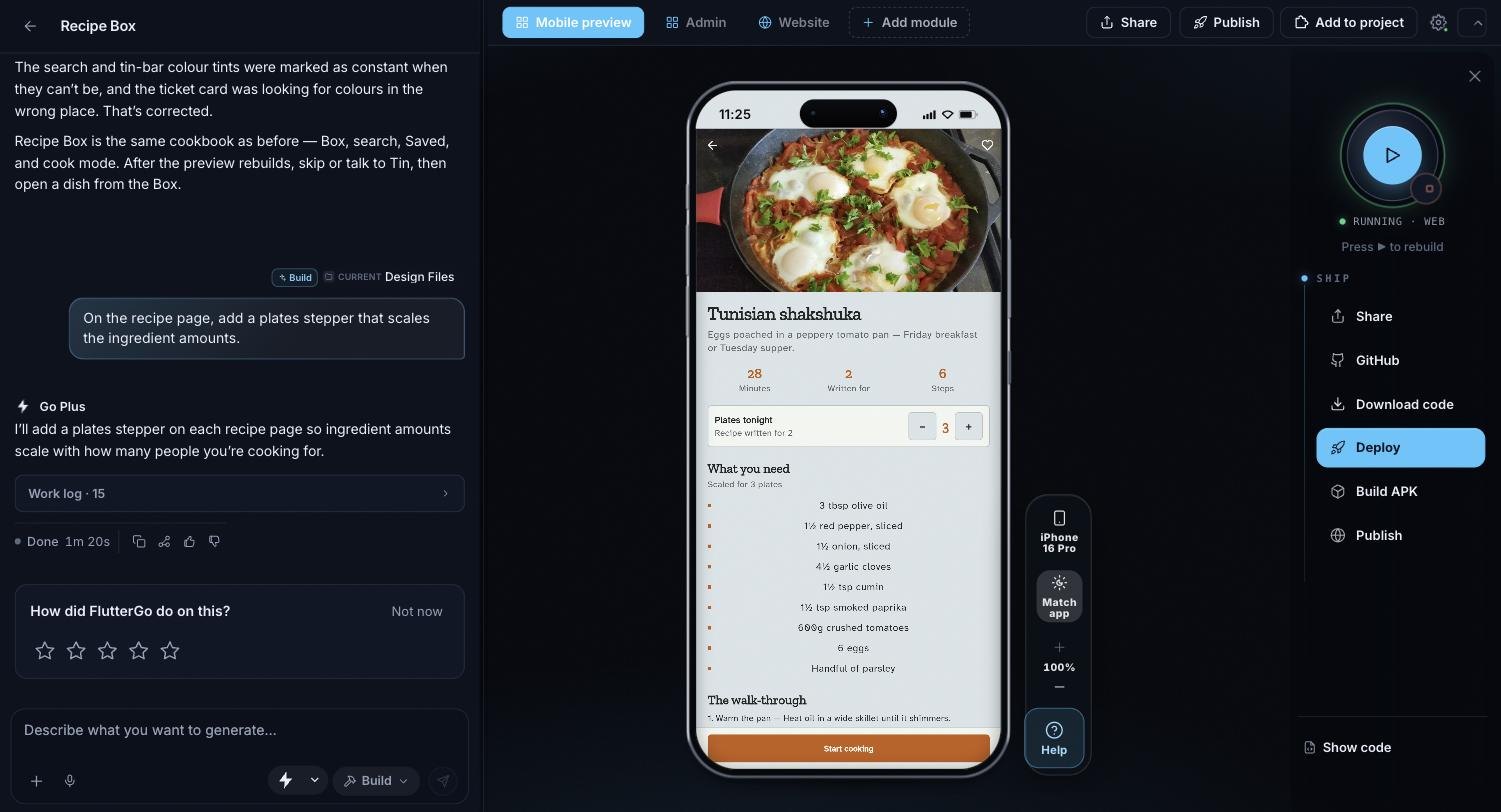
A finished project: chat on the left, the app in the phone preview, and Ship in the right panel.
Success: You created a project. "Only you can see your project by default." Nothing is shared until you share it.
Tip: The chat has two modes. Build changes your app. Plan answers and plans, and changes files only if you clearly ask it to. Switch between them next to Send. See Working with the AI agent.
Common mistake: Writing a whole spec as the project name. The name is just a label: put your description in the prompt box.
Name, rename, star or delete a project#
All your projects are on the Projects page in the left sidebar. Click More actions on a project card:
- Rename: give the project a new name.
- Star: add it to Starred in the sidebar.
- Delete: remove the project. On the Free plan, this frees a slot.
Projects other people shared with you are under Shared with you.
How many projects you can have#
The Free plan allows 2 projects. Starter, Pro and Business have no limit.
Only projects you own count. Projects shared with you don't, and deleting a project frees its slot. Every way of making a new project counts: Start building, the New project dialog, importing a ZIP or a folder, Clone from GitHub, and Clone this app in the Explore gallery.
When you are at the limit, FlutterGo says: "Your plan includes 2 projects and you have 2. Delete a project to free a slot, or see https://fluttergo.ai/pricing/ for plans with no limit."
The New project dialog#
When you have no projects yet, the Projects page shows "No projects yet." and a New project button. It opens the New project dialog:
- Under New Android & iOS App, type a Project name.
- Pick a Design system, or keep the default.
- Leave the other options as they are, and click Create.
The project opens and you describe your app in the chat. The dialog can also import an app, see Importing an existing app. Every project is saved to your account.
For most people, Home and Start building is the simpler way to start.
Troubleshooting#
Problem: "Your plan includes 2 projects and you have 2." Possible causes: You are on the Free plan and already own 2 projects. Solution:
- Delete a project you don't need: Projects, then More actions, then Delete.
- Or upgrade in Plans & billing. Paid plans have no project limit.
Problem: Start building does nothing, or asks you to sign in. Possible causes: You are signed out, or your email address is not verified yet. Solution:
- Sign in, or open the verification email FlutterGo sent you.
- Click Start building again.
Problem: The agent asks what to build instead of building. Possible causes: The description was too short, for example just "App". Solution:
- Answer the Quick setup questions, or
- Send one or two sentences that name the screens and features you want.
FAQ#
Do I need to know Flutter to create a project? No. You describe your app in plain language, and the agent writes the Dart and Flutter code for you.
Where is the New project button? On Home: describe your app and click Start building. The New project button only appears on the Projects page while you have no projects.
Can I build a website instead of an app? Yes. Choose Website under the prompt box. See Building a website.
Who can see my new project? Only you. "Only you can see your project by default." Sharing is always your choice, see Sharing your project.
Can I rename a project later? Yes. On the Projects page, click More actions on the project, then Rename.
Does creating a project cost credits? The agent's work does. Every chat message costs 1 credit, and the description you send with Start building is the first one. Answering the agent's question forms is free.