
FlutterGo.AI helps you build mobile apps in your browser. You describe what you want, and the studio designs it, writes the code, and runs a live preview. You do not need to install anything to try it. The same project can ship to Android and iOS. Pick Website on Home instead, and FlutterGo builds you a website.
The quickest way to understand it is to watch a real app run inside the studio. In the video below, Lumo, a full shopping app built with FlutterGo.AI, compiles and opens in the phone preview next to the chat. You will see onboarding, sign-in, browsing, product pages, the bag, checkout, a confirmed order, saved items, account settings, and search.
Watch the studio showcase (compile time shortened for the video).
Inside the studio: Lumo compiles, boots in the preview, and you can tap through the whole shopping flow without leaving the page. It was recorded in an earlier version of the studio, so the buttons around the phone look different today.
What you are looking at#
Lumo is a working store app, not a slideshow.
- Onboarding uses full-screen photos with Skip and Get started.
- Sign in supports email, Google, or guest checkout.
- Home shows categories, a hero banner, and product cards with real photos and prices.
- Product pages include ratings, colour options, favourites, and Add to bag.
- Bag and checkout handle quantities, shipping, payment choice, and order totals.
- Orders show up right away under My orders with status and details.
- Saved and account cover wishlists, addresses, and preferences.
- Search works across the catalog.
The same codebase can become an Android APK or an iOS build when you are ready to publish. A test APK is included from the Starter plan; signed release builds (APK and .aab) and store deploys from the Pro plan.
The app on its own screen#
Here is the same journey again, full screen, like holding the phone in your hand.
Watch the close-up tour (with narration).
Full-screen walkthrough: onboarding through search, all from one project.
How building works#
You describe the idea. The agent asks a few setup questions, plans the app, writes the code, fixes build issues, and opens a live preview. Want to see that whole process? Read Build your first app.
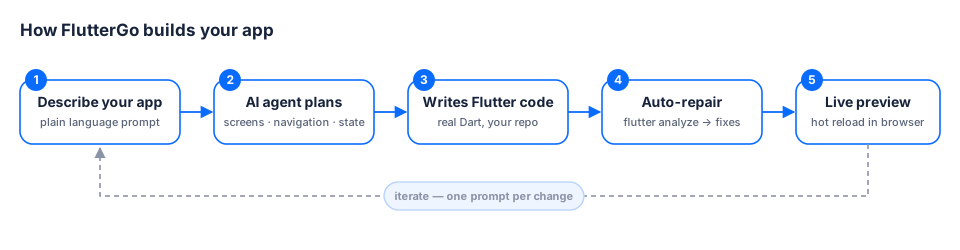
The same loop repeats whenever you send a new prompt.
Getting started#
- Go to fluttergo.ai, click Start free, and create your account.
- Open the confirmation link we email you. Confirming your email unlocks building.
- On Home, describe your app in a sentence or two: name the screens and features you want. Keep Mobile app selected and click Start building.
- Answer the setup questions. The preview opens by itself when the first version is ready.
What you need#
| Browser | A recent version of Chrome, Edge, Firefox, or Safari. |
| Internet | Needed for generation and cloud previews. |
| Account | Free to start. The Free plan gives you 5 credits on day one, then 3 a day for your first week, then 5 a month, and up to 2 projects. |
| Coding skills | Not required. You can still read and edit all the code in the studio with Show code. Downloading it, or syncing it to GitHub, comes with the Pro plan and up. |
| GitHub (optional) | Included from the Pro plan. Your code goes to a private repository in your own GitHub account whenever you push. |
A few tips for your first session:
- On Home, a sentence or two that names the screens and features is enough.
- Change one thing per follow-up prompt after the first build.
- On Pro and up, push to GitHub when you reach a version you like. Nothing is pushed automatically.
- Not sure how to do something? Ask the agent in the chat: it knows FlutterGo, your plan and your credits.
Heads up: FlutterGo.AI changes often. Check Release notes in the sidebar for updates.
FAQ#
Do I need coding skills to use FlutterGo.AI? No. Coding skills are not required, but you can still read and edit all the code in the studio with Show code. Downloading it, or syncing it to GitHub, comes with the Pro plan and up.
What do I need to start using FlutterGo.AI? A recent version of Chrome, Edge, Firefox, or Safari, an internet connection, and a free account. Confirming your email unlocks building.
Is FlutterGo.AI free? You can start for free. The Free plan gives you 5 credits on day one, then 3 a day for your first week, then 5 a month, and up to 2 projects.
Can FlutterGo.AI build apps for both Android and iOS? Yes. The same codebase can become an Android APK or an iOS build when you are ready to publish. A test APK is included from the Starter plan; signed release builds (APK and .aab) and store deploys from the Pro plan.
Can FlutterGo.AI build a website? Yes. Pick Website on Home instead of Mobile app, and FlutterGo builds you a website.
Where to go next#
- Build your first app: watch a full build from a real session.
- Creating your account & signing in
- The studio dashboard
- Plans, credits & billing