
Every project has an AI agent. You tell it what you want in plain language, and it writes the code: a Flutter app in a Mobile app project, a website in a Website project. FlutterGo then checks the code, builds it, and shows it in the preview.
The agent does more than write code. It answers questions about FlutterGo, your plan and your credits. And when you ask, it presses workspace buttons for you, such as Build APK or Share.
You never need to write code yourself. This chapter shows how to talk to the agent, how to steer it, and what each message costs.
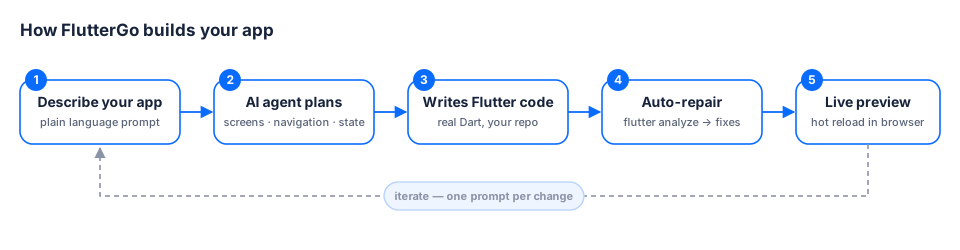
Every request goes through the same stages: you describe it, the agent plans and writes the code, FlutterGo checks it and repairs errors, and the preview updates. Then you send the next request.
What you need#
- You are signed in and have a project open (Build your first app).
- Credits on your account. Every message you send costs 1 credit (see What a message costs below).
How to do it#
1. Find the chat#
Open your project. The chat is on the left. The box you type in, the composer, sits at the bottom of the chat. The app preview is in the middle, and the right panel has Run, Analysis, Ship and Show code.
The composer's controls:
| Control | What it does |
|---|---|
| + (Add context) | Attach files, a Figma link, or connectors. |
| Microphone (Dictate) | Speak your request instead of typing it. |
| Agent picker | Choose the code agent: Go, Go Plus, or Go Max. |
| Plan / Build | Choose whether the agent may change your app. |
| Send / Stop | Send your message, or stop the agent while it works. |
2. Type your request#
Click the box that says "Describe what you want to generate…" and type what you want. Press Enter to send. Press Shift + Enter to start a new line.
3. Pick a mode: Plan or Build#
Click the mode button next to Send. It shows the current mode. Hover an option to read what it does:
- Build (Build mode): "FlutterGo AI writes and edits your Flutter app: screens, widgets, navigation, state, and backend wiring." Use it to turn an idea or a design into working screens, add features, and fix bugs.
- Plan (Plan mode): "Think the app through with FlutterGo AI without changing any code: screens, user flows, data, and packages." Use it to scope a feature, compare approaches, review your code, or understand a build error before you change anything.
New chats start in Build. In Plan, the agent changes files only if your message clearly asks it to. It still presses workspace buttons when you ask, for example "build the APK".
4. Choose a code agent#
Click the agent icon next to the mode button. Under Code agent, pick one:
| Agent | Description on screen |
|---|---|
| Go | "Included on every plan" |
| Go Plus | "Stronger on bigger changes" |
| Go Max | "Our most capable agent" |
All three are available on every plan, Free included. A message costs 1 credit whichever agent you pick. An administrator can switch an agent off. It then shows Unavailable, and your message runs on the nearest agent that is on.
5. Add references#
Click + to attach screenshots, images, or documents. You can also paste an image or drop a file onto the composer. The same menu attaches a Figma link and connectors: see Prompt, design & code generation and Integrations & connectors.
Prefer talking? Click the microphone (Dictate). While it listens it shows "Listening… click to stop" and types what you say into the box. Check the text, then send. The microphone only appears in browsers that support speech input.
6. Send, and watch the agent work#
Press Enter or click Send. While the agent works:
- The reply shows a live line about what it is doing. When it builds an app, the reply also shows its progress through Plan, Design, Screens and Preview.
- You can leave. As the reply says: "You can close this page. The build keeps going, and we'll email you the moment your app is ready."
- You can keep typing. A message you send now waits in a Queued list above the composer and goes out when the current turn ends. You can Edit, Remove, or drag to reorder it before then.
- To cancel the run, click Stop.
7. Answer the agent's questions#
Before a big job, such as a new app from a short description, the agent may ask a few questions first. The chat shows "Mind if I ask a couple of quick questions?" Click it to open the Questions tab, change any answer you like, and click Continue. The agent fills in suggested answers, so you can also click Continue straight away. Answering is free.
8. Review the result#
When the agent finishes, FlutterGo checks the code. If it finds errors, it sends them back to the agent to fix, for free. When the code is clean, it rebuilds the preview so you can see the change. Under the reply you may also see:
- Next steps: three suggestions for this app. Click one to send it as your next message.
- A list of tasks still to do (for example "3 tasks left"), when the agent planned more than it built in one turn. Click Build all to let it carry on, or Build next to a screen to build just that one. Continuing is free.
To read the code the agent wrote, open Show code in the right panel (details in Prompt, design & code generation).
Let the agent press buttons for you#
Ask in plain words, and the agent presses the control for you. For example: "build the APK", "run the app", "share the preview", "push to GitHub", "show the code", "hot reload", or "open billing". The card in the chat then says: "Pressed {control} for you — the same as the button in the workspace."
- If your plan does not include that feature, nothing starts. The card names the plan that unlocks it, and you can upgrade on Plans & billing.
- If you ask how something works, the agent explains it and shows the button without pressing it.
- Some steps always wait for your own click: connecting GitHub, filling in a setup form, creating a Supabase project, connecting or publishing to Vercel, and contacting support.
- A store deploy always starts with a short form. The agent starts it only after you choose Yes, start now.
Ask about FlutterGo, your plan, and your credits#
The agent knows the workspace, the plans, and your account. Ask things like "Where do I build an APK?" or "Which plan do I need to publish to Google Play?". It answers in a few sentences and shows a button for the next step, such as Buy credits or the plans page.
A short account question, such as "how many credits do I have left?" or "what plan am I on?", gets an instant answer for free, without an agent run.
What a message costs#
Every message you send costs 1 credit. That includes Plan mode, every agent, and typed questions.
These are free:
- a short account or support question (see above and Get help from a person);
- the Fix with AI button and FlutterGo's automatic repairs;
- Retry or Continue the run after a turn that failed;
- continuing unfinished tasks with Build all or Build;
- your answers to the agent's questions.
When a repair is free, the chat says so: "Fixing build errors, which does not use your credit."
When you run out of credits#
At 0 credits the chat switches to help only. The agent still answers questions about FlutterGo, your plan, and your credits, a limited number a day. It does not build or change any code until you top up, and your project is kept.
- Above the composer you see "You're out of credits." with Buy credits and Upgrade to {plan}.
- The box reads "Ask about plans, credits or FlutterGo…", and your message is tagged Help only · out of credits.
- Still free: Fix with AI, the automatic repairs, Retry, and answers to the agent's questions.
- On the Free plan, the preview stops and you can't share it until you top up (it keeps running for 30 minutes after your last credit). Paid plans keep the preview running at 0 credits.
Keys and passwords#
Don't paste secret keys into the chat. When your app needs keys, for Firebase, Stripe or Supabase for example, the agent shows a button that opens the right setup form in the project console, the gear at the right of the top bar. See Backends: Supabase, Firebase & secrets.
If you paste a key anyway, FlutterGo recognises common keys, such as Stripe and OpenAI keys or a database address with a password. It saves them to your project before the message is sent. In the chat, a note such as "[Stripe secret key, saved]" replaces the key, and the agent wires it in from there. Keys FlutterGo doesn't recognise stay in the message as typed, so use the setup form for those.
Get help from a person#
- Ask in the chat, for example "talk to a human" or "contact support". You get an instant, free answer with the ways to reach FlutterGo support.
- Refunds go through support. Ask for a "refund" in the chat, or use the Help button.
- The Help button beside the preview opens Need help?. Choose Message us (Message WhatsApp or Email support), or Guides for these docs.
- If you seem stuck, for example the same problem comes back after two fixes, the agent offers a Need a human? card with the same buttons.
Writing good prompts#
You don't need technical language. These all work:
- "A recipe app with a home feed, search, and a detail page with ingredients and steps."
- "Make the onboarding 3 swipeable pages with illustrations and a Get Started button."
- "Change the primary color to deep purple and use rounded cards everywhere."
Rules of thumb that consistently get better results:
| Do | Instead of |
|---|---|
| One goal per message: "add a profile screen", then "add dark mode" | Asking for five features in one message |
| Name the screen: "on the checkout screen, make the pay button sticky" | "make the button sticky" (which button? where?) |
| Describe behavior: "remember the user's choice after restart" | Prescribing packages or implementation details |
| Attach references: screenshots, links, the copy you want | Describing a design you already have from memory |
Tip: Not sure how to do something? Switch to Plan, talk it through, then switch back to Build and ask for it.
Important: The agent changes real project files, and there is no undo button. To undo a change, ask the agent: "undo the last change". For a sure way back, push your project to GitHub before a big experiment (Save your code to GitHub). Fetch then brings that version back, but it replaces the project in FlutterGo, so anything you have not pushed is lost.
Common mistake: Sending a long wish list in one message. The agent will try, but results are much better one goal at a time.
Automatic repair#
After the agent edits your app, FlutterGo runs flutter analyze and sends any errors back to the agent. The repair shows in the chat as a message such as "Fix 3 code errors", tagged Free · no credits. Anything left shows in Analysis in the right panel: click Fix with AI to send it to the agent, or Check again after a change. If something still goes wrong, describe what you see in the chat. See Testing & debugging.
Troubleshooting#
Problem: The Send button does nothing. Possible causes: The box is empty, a file is still uploading, or the message is too long. Solution:
- Type something first. The composer needs text or a file to send.
- If it says "Wait for attachments to finish uploading", wait a moment.
- If it says "Remove {n} characters to send, or attach the long part as a file", shorten the message or attach the long part as a file.
- While the agent works, Send queues your message instead of sending it. It goes out when the current turn ends.
Problem: The agent changed a different screen than I meant. Possible causes: The message did not name the screen. Solution:
- Ask the agent to undo the last change.
- Send the request again and name the screen, for example "on the profile screen…".
Problem: A turn failed with an error. Possible causes: A temporary problem with the agent or the network. Solution:
- Click Retry, or Continue the run when it is offered (it keeps the work already done). Both are free.
- If it says "The connection to the model service dropped before the response finished", check your network, then retry.
- If it fails again, click the copy button next to the error ("Copy error diagnostics") and send it to support from the Help button.
Problem: The chat says "Lost the live connection. The run is still going on the server — reconnecting…" Possible causes: Your network dropped for a moment. Solution: Wait. The run keeps going on the server, and the chat reconnects by itself.
Problem: An agent shows Unavailable. Possible causes: An administrator switched it off. Solution: Pick another agent. Your message runs on the nearest agent that is on.
Problem: Dictate shows "Microphone permission denied". Possible causes: The browser blocked microphone access. Solution:
- Click the permissions icon in your browser's address bar.
- Allow the microphone for this site.
- Click Dictate again. If it shows "Voice input failed — try again", retry once; this is usually temporary.
FAQ#
What is the difference between Plan and Build? Build writes and changes your app. Plan talks it through without changing any code, unless your message clearly asks for a change. Both cost 1 credit per message.
Which code agent should I pick? Start with Go. Try Go Plus for bigger changes, or Go Max for the hardest jobs. All three are on every plan, and each message costs 1 credit whichever you pick.
Does asking a question cost a credit? Yes, a typed question is a message like any other. A short account or support question, such as "how many credits do I have left?" or "talk to a human", is free and answered instantly. So are Fix with AI, Retry, continuing unfinished tasks, and your answers to the agent's questions.
Can I stop the agent mid-run? Yes. Click Stop.
Can I change a message I already sent? Yes. Click the pencil on your message (Edit & resend). It is sent again as a new message (1 credit), and the messages after it are removed. Changes the agent already made to your app stay.
Can I close the tab while it builds? Yes. The build keeps going, and FlutterGo emails you when your app is ready.
How do I undo something the agent did? Ask it to undo the last change. If you pushed to GitHub before the change, Fetch brings that version back; it replaces the project in FlutterGo, so unpushed work is lost.
Can I attach a design screenshot and say "make it look like this"? Yes. Click +, or paste or drop the image, and say what to copy: the layout, the colors, or both.
Can the agent build, share, or push for me? Yes. Ask, and it presses the button, for example "build the APK" or "push to GitHub". Connecting accounts, setup forms, and contacting support wait for your own click.
Where to go next#
- Prompt, design & code generation: how a new app is planned and built, references, and the code view.
- Preview, run & build: run and test what the agent built.
- Plans, credits & billing: credits, plans, and credit packs.