
GitHub gives your app's code a home outside FlutterGo: a private repository in your own GitHub account. Everything happens in one panel: in the right panel, under Ship, click GitHub.
Pushing is always your choice. FlutterGo sends your work to GitHub when you click Push, and never on its own. Opening a project does not pull anything from GitHub either. To bring code from GitHub into FlutterGo, you click Fetch.
Here we connect your GitHub account, create or link a repository, and explain Push, Preview GitHub and Fetch, branches, and version history.
What you need#
- A FlutterGo plan from Pro up. GitHub is not part of the Free or Starter plans.
- A GitHub account. GitHub's free plan is fine.
- Pop-ups allowed for fluttergo.ai. GitHub's sign-in window opens as a pop-up.
How to do it#
1. Open Ship → GitHub#
Open your project. In the right panel, under Ship, click GitHub. The GitHub panel opens over the preview.
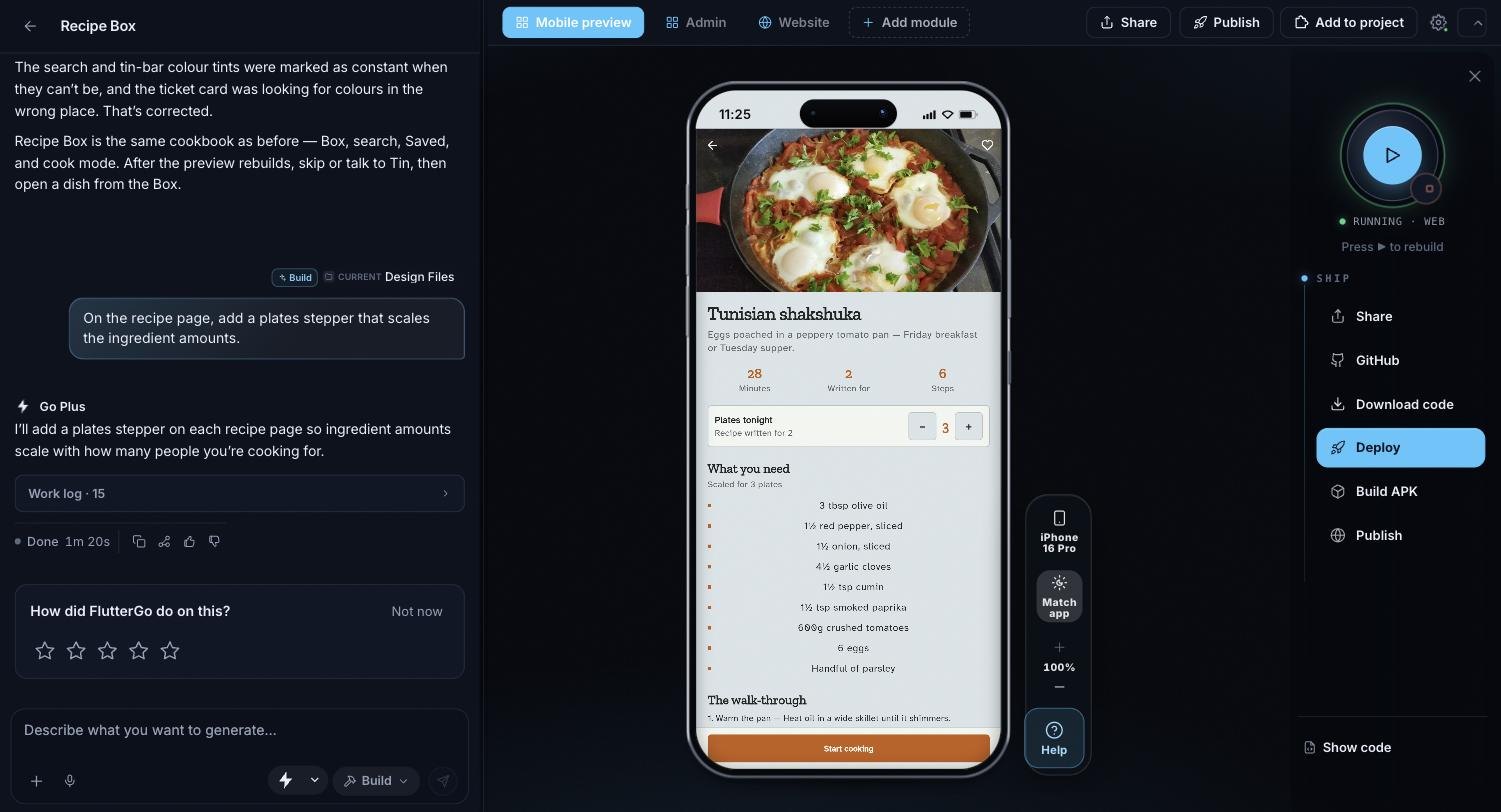
The right panel's Ship list: Share, GitHub, Download code, Deploy, Build APK and Publish.
On the Free and Starter plans the panel shows an upgrade card instead (Unlock with Pro and See all plans). Every plan from Pro up includes GitHub.
In a Website project, click GitHub (the GitHub icon) in the bar under the website preview. It opens the same panel.
Tip: You can also ask in the chat, for example "push my code to GitHub". The agent opens the panel and presses Push for you. A chat message costs a credit; clicking Push yourself does not.
2. Connect your GitHub account (first time only)#
If GitHub is not connected yet, the panel shows Not connected and three steps: "Click Connect GitHub", "Install FlutterGo on your account", "Come back here".
- Click Connect GitHub. The button changes to Waiting for GitHub….
- In GitHub's window, sign in if asked and approve FlutterGo. This tells FlutterGo who you are on GitHub.
- If the FlutterGo app is already installed on your GitHub account, FlutterGo finds it and you are done.
- If not, GitHub shows its install page. Choose All repositories (simplest), or only the repositories you want FlutterGo to use, and confirm. Then come back to FlutterGo.
The panel now shows Connected. You connect once per account: your other projects use the same connection.
Tip: You can also connect outside a project: Settings → App repo & secrets has a GitHub card with the same Connect GitHub button, and Manage on GitHub once you are connected.
3. Create a new repository, or link one you have#
The panel explains: "Create a new private repository and push your code, or link one you already have on GitHub." Pick a tab:
- Create new: FlutterGo creates a private repository for you. The Repository name is filled in from your project name (lowercase letters, numbers and hyphens). Click Create repo & push code. FlutterGo creates the repository and pushes your whole project in one go.
- Link existing: pick a repository under Repositories you can access, or type it under Invited repo? Paste owner/repo. Click Link repository. Linking pushes nothing: the panel says "Use Push when you are ready to upload your code."
Important: Linking a repository that already holds code? Click Preview GitHub before your first Push, to see how GitHub's copy differs from your project (see the next section).
4. Push your work#
Click Push to send your work to GitHub. When there are changes, the button shows the count, for example Push (3). A progress bar runs while the files upload.
The panel's title is now your repository (owner/repo: click it to open GitHub), with the branch and your GitHub account under it. Above the buttons, a status line tells you where you stand:
- "✓ No unpushed cloud changes": GitHub has everything.
- "3 cloud changes not on GitHub (+1 ~2)": you have work to send. The list On cloud (not pushed) names each file; click one to see what changed.
Success: Your work is a new commit on the branch, and the status line returns to "✓ No unpushed cloud changes".
Push, Preview GitHub and Fetch#
The panel sums it up: "Push sends your latest work to GitHub. Fetch replaces this project with the GitHub copy, and only after you confirm."
| Button | What it does | Changes your FlutterGo project? |
|---|---|---|
| Push | Sends your project to the linked branch as one new commit. | No |
| Preview GitHub | Shows what GitHub has that your project doesn't, under On GitHub (would replace cloud if you Fetch). Click a file to see the difference. | No |
| Fetch | Replaces your project with the branch on GitHub, after you confirm. | Yes |
About Push:
- Your other files on GitHub stay as they are. A push only removes a file from GitHub if FlutterGo pushed it before and you have since deleted it in FlutterGo.
- Files over 5 MB are not pushed. The result names them, and the copies on GitHub stay as they are.
- Secret files are never pushed:
.envfiles, signing keys and keystores, service-account files and Firebase config files.
About Fetch: before anything changes, FlutterGo shows how many files GitHub would overwrite, add and remove, and warns: "Unpushed work on the cloud server will be lost. GitHub cannot restore it unless you pushed first." Click OK to go ahead. Your project then matches the branch, and the preview rebuilds from the fetched code. Your secret files and files over 5 MB stay in the project.
Important: Fetch cannot be undone. Push first if your project has work you want to keep.
Branches#
The Branches list shows the repository's branches, with a ✓ next to the one you are on.
- Switch: click a branch. From then on, Push and Fetch use it. Switching does not change your project's files: click Fetch if you want that branch's code.
- Create: type a name under New branch name and click Create. The new branch starts from the current one.
Other ways your code reaches GitHub#
- App identity: when the project has a linked repository, saving App identity (your app's name, IDs or icon) with Save to project shows a Push to GitHub button. It pushes like the panel's Push. Open App identity from the gear in the top bar (its tooltip says "Supabase console").
- App Store deploys: an App Store deploy builds on GitHub Actions in your repository. When it starts, it pushes your current code, plus FlutterGo's build workflow file, to the branch it builds from. See Publishing to the App Store.
- Website projects: on the Website tab, the bar under the website preview has a GitHub button (the GitHub icon). It opens this same panel, from the Pro plan up. See Building a website.
Google Play deploys do not use GitHub at all: FlutterGo builds and uploads them in its own cloud. See Publishing to Google Play.
Version history, restore an older version#
Your version history is the commit list of your repository on GitHub. Each push is one commit, with a message like these:
| Commit message | Made by |
|---|---|
| FlutterGo: initial project setup | Create repo & push code |
| FlutterGo: save changes | Push, or Push to GitHub in App identity |
| FlutterGo: deploy app + workflow | An App Store deploy |
To go back to an older version:
- Open your repository on GitHub (click its name at the top of the GitHub panel) and find the commit you want under Commits.
- Put that version on a branch, on GitHub or with git on your computer. For example, revert the later commits, or create a new branch from that commit.
- In FlutterGo, open Ship → GitHub. If you made a new branch, click the refresh button, then click the branch.
- Click Preview GitHub to check, then Fetch.
For a small, recent change, it is often quicker to ask the agent to change it back.
Working outside FlutterGo#
Your repository is a standard Flutter project. Clone it, open it in Android Studio or VS Code, and run it with Flutter on your own computer. Secret files are not in the repository, so add your own .env and signing files there.
To bring your edits back, push them to the linked branch, then in FlutterGo click Preview GitHub and Fetch.
Tip: Work in one place at a time. Push from FlutterGo before you edit on your computer, and Fetch when you come back. That way no work is overwritten.
Switch account, disconnect or unlink#
At the bottom of the GitHub panel:
- Switch account: disconnects your GitHub account and connects a different one. The project stays linked to its repository.
- Disconnect GitHub: disconnects your GitHub account from FlutterGo.
- Unlink repository: removes the link between this project and its repository. "Your cloud copy stays on FlutterGo. GitHub sync stops until you link a repository again." Nothing is deleted on GitHub.
To remove FlutterGo's access completely, uninstall the FlutterGo app in your GitHub settings (Manage on GitHub in Settings → App repo & secrets takes you there).
Troubleshooting#
Problem: GitHub shows a 404, or FlutterGo says your GitHub account "appears to be flagged by GitHub's spam systems". Possible causes: GitHub blocks app installs for some new or flagged accounts. The problem is the GitHub account, not FlutterGo. Solution:
- Open github.com/settings while signed in to that account and follow the "account flagged" banner to appeal.
- Or connect a different GitHub account.
Problem: "GitHub connect timed out." Possible causes: The pop-up was blocked, or closed before you finished. Solution:
- Allow pop-ups for fluttergo.ai.
- Click Connect GitHub again and finish every screen in GitHub's window.
- If GitHub's install page showed a 404, FlutterGo may already be installed on your account. Click Connect GitHub again: FlutterGo checks for an existing installation first.
Problem: The repository you want is not in the list. Possible causes: The FlutterGo app has no access to it, or GitHub's access to repositories shared with you expired. Solution:
- If the panel says "GitHub access expired", click Reconnect GitHub access.
- Otherwise, type it under Invited repo? Paste owner/repo.
- For someone else's repository, you must be a collaborator, and its owner must install FlutterGo on that repository.
Problem: Push is greyed out, or the panel says the project is linked but GitHub is not connected. Possible causes: No repository is linked yet, or your GitHub connection was removed. Solution:
- With no repository linked, follow step 3 above.
- Otherwise click the refresh button (or Refresh ↻). If the panel still asks, click Connect GitHub (or Connect GitHub App) and approve.
Problem: Fetch replaced work you wanted. Possible causes: That work was never pushed. Solution:
- Only pushed work can be recovered: it is in your repository's commits (see "Version history" above).
- Next time, push before you fetch.
FAQ#
Is my repository private? Repositories that FlutterGo creates are private, in your own GitHub account. A repository you link keeps its own setting. You can change it on GitHub.
Does FlutterGo push automatically? No. Nothing goes to GitHub until you click Create repo & push code, Push or Push to GitHub (in App identity), ask the agent to push, or start an App Store deploy.
Does opening a project pull from GitHub? No. Your project only changes when you click Fetch.
What is the difference between Preview GitHub and Fetch? Preview GitHub only shows what GitHub has. Fetch replaces your project with GitHub's copy, after you confirm.
Can I use a branch other than main? Yes. Click any branch under Branches, or create one with New branch name and Create.
Do pushes cost credits? No. Pushing and fetching cost no credits. Asking the agent to push is a chat message, which costs a credit.
What happens to my code if I cancel my plan? The code in your GitHub repository stays yours.
Where does a teammate's work come in? When a teammate pushes to the branch, click Preview GitHub to see the changes, then Fetch. Fetch replaces work that you haven't pushed yet.
Where to go next#
- Your code: export & download
- Publishing to the App Store: App Store builds run in your GitHub repository.
- Publishing to Google Play: no GitHub needed.
- Importing an existing app
- Troubleshooting & FAQ